How do I connect MetaMask with Tokenize.it?
.png)
To use the Tokenize.it web application as an investor or founder, you need a Web3 Wallet. If you have no experience with Web3, it is very important to understand the correct handling of a Web3 wallet in order to use Web3 applications like Tokenize.it. In particular, the security aspect is very important when using Web3 wallets.
Therefore, in this blog post we will give you an insight into the Ethereum Wallet MetaMask and how to connect it to the Tokenize.it platform.
Key facts:
- MetaMask is one of the most widely used Ethereum hot wallets.
- Keep your private key secret and create a backup.
- MetaMask can be connected to the Tokenize.it web application with a few clicks.
What is Web3 and why do I need a wallet?
Let's start at the beginning. What is Web3 and why do I need a wallet for it?
Web3 is a concept for the next phase of the Internet, based on decentralized technologies such as blockchain and cryptocurrencies to enable greater security, privacy, and interoperability. Web3 strives to put control of personal data and digital interactions back in the hands of users.
In order to interact with Web3 and the underlying blockchain technology, a wallet is required. A wallet is, therefore, a type of digital wallet that can be used to send and receive cryptocurrencies and digital assets, but also to register with Web3 applications.
How does a wallet work?
To understand how a wallet works, it is necessary to understand the general functionality of a blockchain and the underlying cryptography.
As this quickly becomes very complex, it will not be discussed in detail here. To summarize it simply: A wallet creates and manages a so-called private key for you. The private key is nothing more than a very long random number. You can use this random number to create digital signatures that make certain values stored on the blockchain accessible only to you. A wallet also creates and receives transactions for you, and forwards them to the blockchain network. To learn more about what a wallet is and what the private key has to do with it, take a look at this blog post.
MetaMask Basics
MetaMask is the most popular and widely used hot wallet in the Ethereum ecosystem. Hot wallet means that it is used online, which significantly increases user-friendliness. Cold wallets, on the other hand, prioritize security and only work offline.
If you are logging into our web application for the first time, we recommend that you create a MetaMask wallet and use it to log in. Below we will give you the most important basics on how to use MetaMask as a browser extension and understand the security aspects involved.
Add MetaMask Browser Extension
MetaMask can easily be added as an extension to your browser. With this extension, you can easily connect your wallet to Tokenize.it if you are using a laptop or PC. MetaMask is also available as an app for your smartphone, which you can also use to connect to our web app.
If you use a Chromium browser (e.g.: Google Chrome, Brave, Opera), you can add MetaMask to your browser as an extension in the Chrome Webstore.
If you use a different browser (e.g. Firefox or Safari), you can usually also add MetaMask as an extension in their own extension stores. You can find an overview of the various browsers supported by MetaMask here.
Private Key and Security
Once you have added MetaMask to your browser for the first time, you will need to go through some initial steps to set up your wallet. These include securing your private key and creating a password to protect your wallet. You can find detailed instructions on how to do this and other useful tips and settings here.
IMPORTANT! Your private key must never be made public and must always remain secret.
If someone else has access to it, they can steal the values you have in your wallet.
It is also important that you make a backup of your private key. This means that you write it down and keep it in a secure place. MetaMask automatically prompts you to create a backup of your recovery phrase (private key) when you create your wallet. If you uninstall your MetaMask wallet or use a new device, you can easily re-import your wallet with the recovery phrase.
The recovery phrase is presented in a special form called a"mnemonic seed phrase". This makes your private key, which would otherwise be just a very long number, easier to read because it generates 12 words that you must write down in the correct order (IMPORTANT). If you write down a word in the wrong place, you will no longer have access to your wallet when you try to import it again.
If you lose your recovery phrase and you have not backed up your wallet, the values stored in your wallet will be lost forever! There is no way to recover them.
When creating your MetaMask wallet, make sure you do everything you can to keep your private key safe by making an analog backup and not sharing it with anyone. You should also make sure that no one is watching or photographing your recovery phrase. It is best to take 10 minutes and create it alone in a room where only you are present and no one can look at your screen.
Also make sure that your Internet connection is secure and that no one else can see what you are doing on your screen.
These basic security measures also apply to other wallets, not just MetaMask.
Structure of the MetaMask Wallet (Browser Extension)
Once you have completed the serious part of creating and securing your private key, the fun part begins: you can now use your wallet. You don't have to worry, because nothing can really go wrong. Let's take a look at the structure of the MetaMask browser extension.
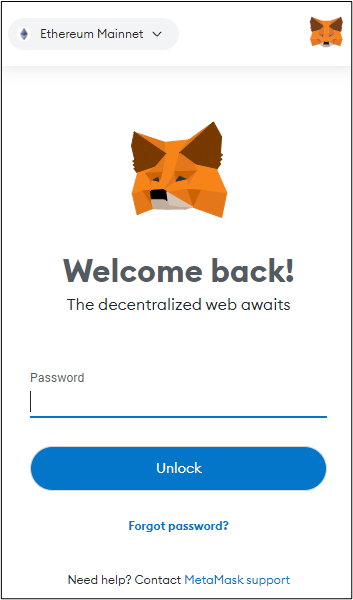
When you open your MetaMask wallet, you will first be asked for your password to unlock it. This password is not the private key and it is not a problem if you forget or lose it. It is only used to prevent unauthorized users from accessing your wallet.
After unlocking the wallet, MetaMask looks like this in the extension:
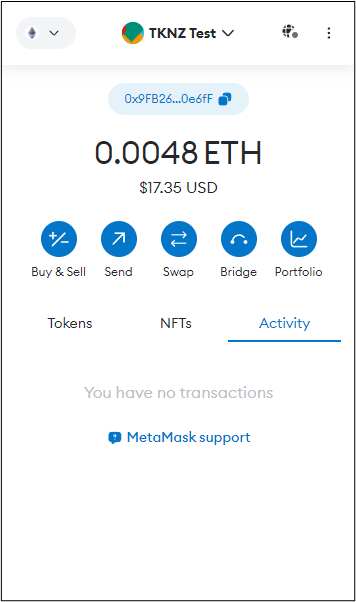
Let's take a look at the main features.
At the top of the bar, in the center, you will see the account you have just created. If you click on the drop-down menu, you can select different accounts and create as many new accounts as you like. For example, you can have one account where you only store NTFs, another where you log in to the Tokenize.it web application, and so on.
On the left side you will find another selection list. Here you select the network you want to interact with your wallet. The default is the Ethereum mainnet, which is the Ethereum blockchain itself. However, other networks from the Ethereum ecosystem can also be set. This setting is not that important for you at first, and when you log in to the Tokenize.it web application, the correct network (Ethereum Mainnet) is always automatically selected for you.
On the right side of your account, you can go to Settings via the three dots. There you can, for example View your account details, expand the view, or contact support.
Your account balance is displayed in the top center. Above this is your receiving address. This receiving address is derived from your private key and changes as soon as you create a new account. Don't worry, the address is derived from the private key, but it is impossible to deduce your private key from it - that's why it is also called public key, because you can share it with others without any problems and even have to if you want to receive Ether or other tokens. When you click on the address, it is automatically copied to your clipboard.
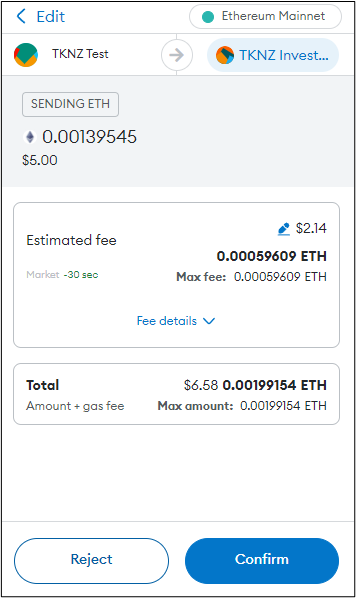
There are various blue buttons under your account balance and your address. The most important button for you as a beginner is the "Send" button. You can use it to send a transaction to the Ethereum blockchain and use it to transfer cryptocurrencies and tokens to other wallets. If you click on "Send", the following input mask opens.
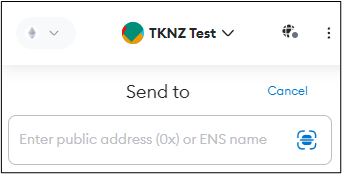
Where it says "Enter public address (0x) or ENS name", enter the address to which you want to send something. Once you have done this, you should check again whether you have entered the address correctly. If you enter even one number or letter incorrectly, the transmitted values will never reach the recipient and will be lost.
After you have entered and checked the address, select what and how much you want to send. Once you have entered the correct values, all you have to do is click "Next". Meta Mask also gives you an overview of the transaction fees and automatically sets them for you. Note that you always have to pay transaction fees. You must therefore always have a little more Ether in your account than you want to send.
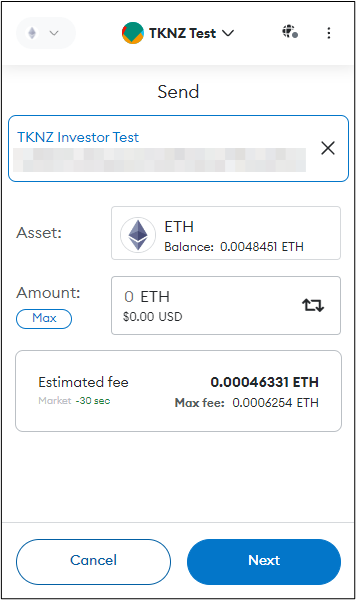
After clicking "Continue", a transaction summary and the fees incurred will be displayed. When you click "Confirm", the transaction will be executed. Done!
We will not go into the other features of the MetaMask Wallet for now, as they are less relevant to you as a beginner.
Adding a Cold Wallet in MetaMask
With MetaMask you have the option to sign up with a cold wallet, which we recommend to increase your security. This way you can combine the advantages of the increased user-friendliness of MetaMask with the security of your cold wallet.
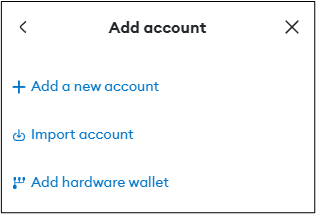
Simply click on your account in the bar at the top of MetaMask.
And then click on the option "Add account or hardware wallet".

The "Add Hardware Wallet" option will then appear. If you click on it, you will be automatically redirected and can connect your hardware wallet (e.g. Ledger, Trezor, or Lattice1).
With the cold wallet connected, you can then simply log in to Tokenize.it. You can find detailed instructions on how to securely connect a Ledger hardware wallet to MetaMask here.
Connecting MetaMask to the Tokenize.it web application
How do I connect my MetaMask wallet with Tokenize.it?
To use our web application, you need to go to the Tokenize.it homepage and click on the green login button (top right and bottom center). This will automatically redirect you to our web application.
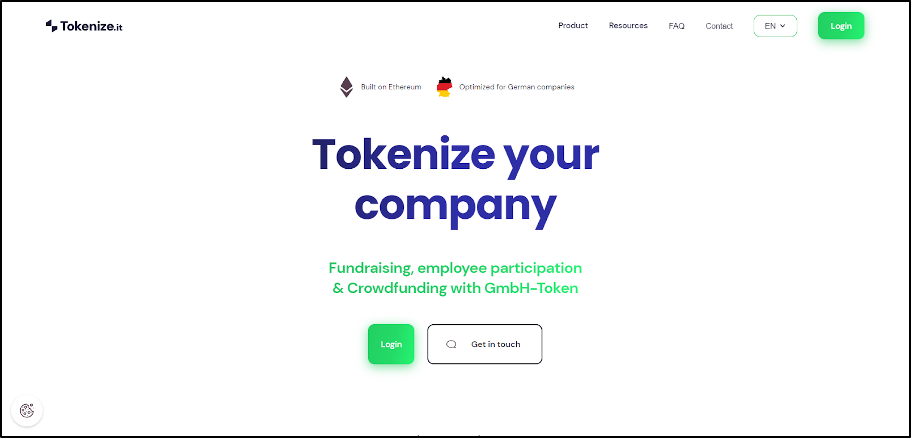
Once you click on the button, this start page of our web application will open:

Click on the green button "Connect with wallet or Google".
Select login method: Another window will now appear in which you can select the method you would like to use to register.
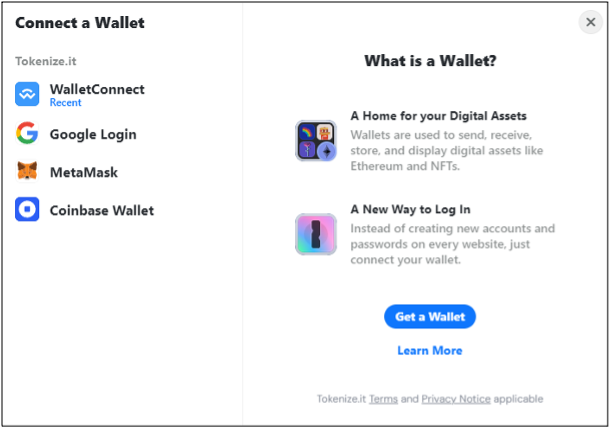
On the left-hand side you will find all the options you have to log in to the Tokenize.it platform. In this guide, we will focus on the wallet login via MetaMask.
If you have already created a MetaMask wallet and added it as a browser extension, you must proceed as follows.
Select MetaMask as login option: Click on MetaMask. If the browser extension is installed correctly, this window will open:
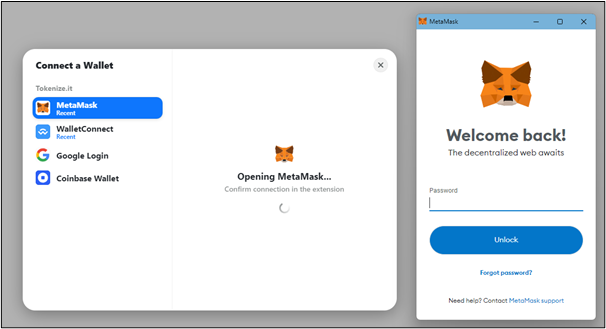
Unlock wallet: First enter your password to unlock your wallet.
Select the right account: If you have several accounts in your wallet, this window will open:
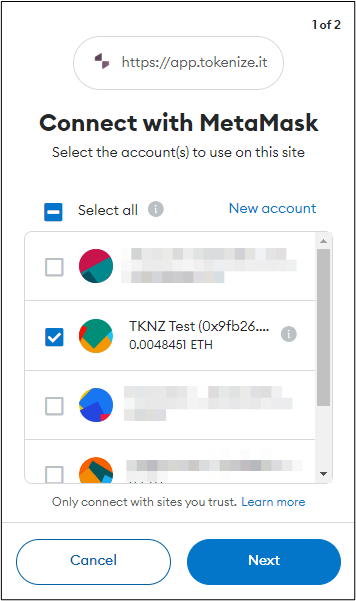
There you select which account you would like to use for registration. Once you have selected an account and confirmed with the blue "Next" button, you will be taken to the next screen.
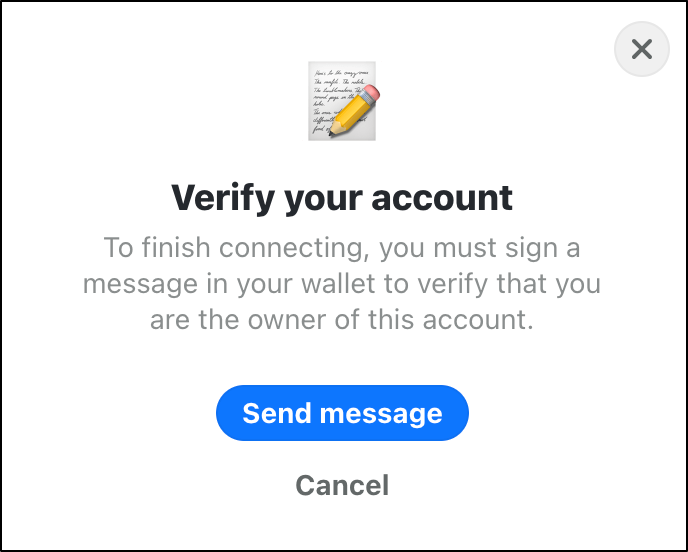
Establish connection with MetaMask:

MetaMask has recognized that our platform wants to connect to your wallet and asks for your permission. You must give this permission by clicking on the blue "Connect" button.
Verify account: Finally, you just need to verify your account by clicking on the blue button "Send message".
An overview will then open again in the MetaMask browser extension.
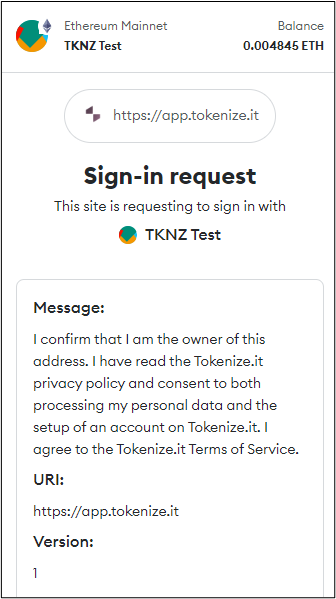
Click on the blue "Log in" button to confirm the connection.
You're done! You have successfully connected your MetaMask wallet to the Tokenize.it web app. You will now be guided through our registration process and can get started.
If you have any further questions...
Take a look at our documentation.
You also have the option of using the contact form to ask us your questions directly.
Frequently asked questions
What is a wallet?
A wallet makes your tokens or cryptocurrencies accessible for you. It is used to manage your private key and interact with the blockchain. You can use it to send and receive transactions to and from blockchain networks. Read our blog article about wallets and private keys to find out more.
Why do I need a wallet to use Tokenize.it?
Tokenize.it uses tokens on the Ethereum blockchain to represent profit participation rights on the Internet in a secure and unique way. We call these tokens "GmbH tokens". The creation of the tokens is made possible by smart contracts on the blockchain. In order to receive and securely store the GmbH tokens or transfer them, you need a wallet to interact with the blockchain and the smart contracts.
How does a wallet work?
A wallet creates and manages a so-called private key for you. The private key is basically nothing more than a very long random number. You can use this random number to create digital signatures that make certain values stored in the blockchain only accessible to you. For example, the GmbH tokens that you receive or issue. With the help of the wallet, you can also transfer GmbH tokens to other wallets.
What is a cold wallet?
Wallets are divided into hot wallets and cold wallets. Hot wallets are available online, which makes them more user-friendly, but can also pose an increased security risk. Cold wallets are offline. This makes them more secure, but also more cumbersome to use. The MetaMask wallet presented in this guide is a hot wallet and therefore in comparison quite easy to use. It is well suited for logging in to Tokenize.it for the first time and getting a feel for our web application. However, if you receive GmbH tokens, you should send them to a cold wallet to ensure a higher level of security. You can either add your hardware wallet directly to MetaMask and use it to log in (see instructions under: "Adding a cold wallet in MetaMask") or you select your cold wallet address as the receiving address when you receive the tokens. Whether you use a hot wallet or a cold wallet is up to you.
How do I handle a wallet securely?
The most important thing is that you always keep your private key secret and store it securely in the form of an analog backup. If someone else has access to it, they can steal your stored values.
Also make sure that you write down the backup of your private key correctly. If you lose your private key, the values associated with the wallet will be lost forever!
Which wallets can I use for Tokenize.it?
You can use any wallet that is compatible with the Ethereum ecosystem to use Tokenize.it. For example MetaMask, Coinbase Wallet, Google Login and Wallet Connect which we also offer as login options. With Wallet Connect you can use many different Ethereum wallets that you already have on your smartphone, PC or laptop. Just scan the generated QR code with your wallet. This also works with MetaMask if you already have a MetaMask wallet on your smartphone.
Published on
March 20, 2024